Posted in worskshops

Workshop dates 2018: Crochet Motifs

These are the dates for the Motif Workshop for the rest of the year. My new workshop theme will be announced the end of July. Please book with the contact person as indicated. I really can’t wait to meet you all and to have a wonderful crochet day! For me these workshops are blessings!

datums2018nuut

Posted in crochet

Angel Wings

This my special thank you free pattern for all the support the past year. It was a tough year for me and I really want to thank each and everyone who supported me and motivated me when I needed strength to carry on. I am going to take a break for the rest of December and will see you in the New Year. May you have a blessed festive season!

What you will need:

Vinnis Colours Nikkim in Natural and 3 mm crochet hook

Sugar:water (50:50) solution, starch or a solution of wood glue and a little bit of water

Abbreviations (American terminology):

beg – begin, ch – chain stitch, dc – double crochet stitch, cl – cluster, gp – group, hdc – half double crochet stitch, rep – repeat, rnd – round, sc – single crochet stitch, sp – space, ss – slip stitch, st(s) – stitch(es), tog – together, tr – treble stitch

Size: 42 cm in length

Pattern:

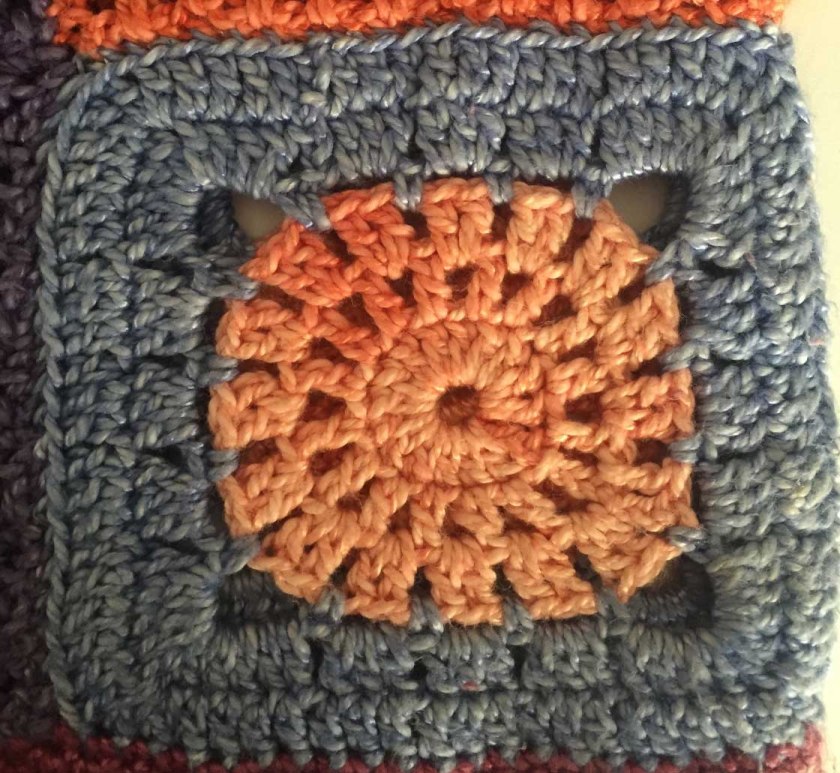
With Natural, crochet 8 ch, ss into the 1st ch to form a ring.

Rnd 1: 1 ch, 16 sc in ring, ss in the 1st sc.

Vlerke 1

Rnd 2: 3 ch, 1 dc in the next sc, 2 ch, *1 dc in the next 2 sc, 2 ch; rep from * to end, ss in top of beg-3 ch.

vlerke 3

Rnd 3: 3 ch, 1 dc in the next dc, 5 ch, *1 dc in the next 2 dc, 5 ch; rep from * to end, ss in top of beg-3 ch.

vlerke 4

Rnd 4: 3 ch, 1 dc in the next dc, 3 ch, 3 dc-cl in the same st, 1 ch, 3 dc-cl in the next dc, 3 ch, *1 dc in the same st and in the next dc, 3 ch, 3 dc-cl in the same st, 1 ch, 3 dc-cl in the next dc, 3 ch; rep from * to end, ss in top of beg-3 ch.

vlerke 5

Rnd 5: 3 ch, 1 dc in the next dc, 3 ch, 3 dc-cl in the same st, 1 ch, 1 dc in the next 1 ch-sp, 1 ch, 3 dc-cl in the next dc, 3 ch, *1 dc in the same st and in the next dc, 3 ch, 3 dc-cl in the same st, 1 ch, 1 dc in the next 1 ch-sp, 1 ch, 3 dc-cl in the next dc, 3 ch; rep from * to end, ss in top of beg-3 ch.

vlerke 7

Rnd 6: 3 ch, 1 dc in the next dc, 3 ch, (1 tr, 2 ch, 1 tr) in the next dc, 3 ch, *1 dc in the next 2 dc, 3 ch, (1 tr, 2 ch, 1 tr) in the next dc, 3 ch; rep from * to end, ss in top of beg-3 ch.

Rnd 7: 1 ch, 1 sc in the same st, 1 sc in the next dc, 3 sc in the next 3 ch-sp, 1 sc in the next tr, 2 sc in the next 2 ch-sp, 1 sc in the next tr, 3 sc in the next 3 ch-sp, *1 sc in the next 2 dc, 3 sc in the next 3 ch-sp, 1 sc in the next tr, 2 sc in the next 2 ch-sp, 1 sc in the next tr, 3 sc in the next 3 ch-sp; rep from * to end, ss in the beg-sc.

vlerke 9


From here the wing point is formed:

Row 1: 1 ch, 1 sc in the same st, 1 hdc in the next sc, 1 dc in the next sc, (3 ch, skip 2 sc, 1 sc in the next sc) 10 times, 3 ch, skip 2 sc, 1 dc in the next sc, 1 hdc, in the next sc, 1 sc in the next sc, turn.

Row 2: ss in next 3 sts and into 3 ch-sp, 1 sc in the same sp, *4 ch, 1 sc in the next 3 ch-sp; rep from * to end = 10 ch-sps, turn.

vlerke10

Row 3: ss into 4 ch-sp, 1 sc in the same sp, *5 ch, 1 sc in the next 4 ch-sp; rep from * to end = 9 ch-sps, turn.

Row 4: ss into 5 ch-sp, 1 sc in the same sp, *6 ch, 1 sc in the next 5 ch-sp; rep from * to end = 8 ch-sps, turn.

Row 5: ss into 6 ch-sp, 1 sc in the same sp, *6 ch, 1 sc in the next 6 ch-sp; rep from * to end = 7 ch-sps, turn.

Row 6: ss into 6 ch-sp, 1 sc in the same sp, *6 ch, 1 sc in the next 6 ch-sp; rep from * to end = 6 ch-sps, turn.

Row 7: ss into 6 ch-sp, 1 sc in the same sp, *6 ch, 1 sc in the next 6 ch-sp; rep from * to end = 5 ch-sps, turn.

Row 8: 6 ch, 1 sc in the 1st ch-sp, *6 ch, 1 sc in the next 6 ch-sp; rep from * to end, 3 ch, 1 dc in the last sc = 6 ch-sps, turn.

Row 9: ss into 3 ch-sp, 1 sc in the same sp, *6 ch, 1 sc in the next 6 ch-sp; rep from * to end = 5 ch-sps, turn.

Row 10: rep row 8.

Row 11: rep row 9.

Row 12: ss into 6 ch-sp, 1 sc in the same sp, *6 ch, 1 sc in the next 6 ch-sp; rep from * to end = 4 ch-sps, turn.

Row 13: 5 ch, 1 sc in the 1st ch-sp, *5 ch, 1 sc in the next 6 ch-sp; rep from * to end, 2 ch, 1 dc in the last sc = 5 ch-sps, turn.

Row 14: rep row 12.

Row 15: rep row 13.

Row 16: rep row 12.

Row 17: 3 ch, (4 dc in next 5 ch-sp) 4 times, 1 dc in last st, turn.

Row 18: 3 ch, 1 dc in next dc, (2 dc tog over next 2 dc, 1 dc in next 2 dc) 4 times, turn.

Row 19: 4 ch, (skip 1 dc, 1 dc in the next dc, 1 ch) 5 times, 1 dc in the next dc, turn (leave last dc) = 7 dc.

Row 20: 3 ch, (1 dc in the 1 ch-sp, 1 dc in the next dc) 6 times, turn = 13 dc.

Row 21: 3 ch, 2 dc tog over next 2 dc, (1 dc in the next dc, 2 dc tog over next 2 dc) 3 times, 1 dc in last st, turn.

Row 22: 3 ch, 1 dc in every st, turn = 9 dc.

Row 23: 4 ch, (skip 1 dc, 1 dc in the next dc, 1 ch) 3 times, 1 dc in the next dc, turn.

Row 24: 3 ch, (1 dc in the 1 ch-sp, 1 dc in the next dc) 4 times, turn = 9 dc.

Row 25: 3 ch, 1 dc in the next dc, 2 dc tog over next 2 dc, 1 dc in the next dc, 2 dc tog over the next 2 dc, 1 dc in the last 2 dc, turn.

Row 26: 3 ch, 2 dc tog over the next 2 dc, 1 dc in the next dc, 2 dc tog over the next 2 dc, 1 dc in the last dc, turn.

Row 27: 3 ch, 3 dc tog over next 3 dc, 1 dc in last dc, turn.

Row 28: 3 dc, 2 dc tog over next 2 dc, turn.

vlerke 11

With RS front, work 2 rounds sc around the wing, ending each rnd with ss.

Last rnd: 1 ch, 1 sc in the same st, *3 ch, skip 1 sc, 1 sc in the next sc; rep from * to end.


Posted in crochet

Beginner Lessons : how to be left-handed and crochet the ‘right'(-handed) way – week 2

This week I will show you the basic stitches. From here on you will be able to do a lot of  stitch patterns and more fancy stitches by using these basic stitches.  In the next lesson I will show you the basics of rounds. 

Basic stitches (working in ROWS)

Please watch and practise with the videos with each stitch in order to see how the right-hand technique is used and use the photos to assist you in how the stitch is made.

Below are the symbols of the basic stitches explained in this lesson as it appears on crochet diagrams.

simbole vir boekejol

The slip stitch (ss) 

Click here to watch the video.

The slip stitch does not have height, but is more a utility stitch mostly used to combine rounds.

  1. Insert the hook from the front to the back in the next chain of the first chain from hook just below the upper loop in the small opening visible.
  2. Wrap the yarn from the back to the front over the hook.
  3. Draw the yarn through both loops while one loop stays on the hook.

glipsteek 1jpg

glipsteek 2

Single crochet stitch (sc) 

Click here to watch the video.

The single crochet stitch is the shortest stitch.

  1. Insert the hook from the front to the back in the 2nd chain (in order to have the height of 1 chain, but it DOES not count as the first stitch) from hook just below the upper loop in the small opening visible.

kortbeen 1 kortbeen 2

2. Wrap the yarn from the back to the front over the hook.

3. Pull the yarn through the same opening,  leaving 2 loops on the hook.

4. Wrap the yarn from the back to the front over the hook.

5. Draw the yarn through both loops on the hook while one loop stays on the hook.

kortbeen 3 kortbeen laaste

When doing the next row, make 1 chain stitch and turn the work.

Make 1st single crochet in the first opening below both the upper loops.

ALL the single crochet stitches from now on are made below both the upper loops unless the pattern states otherwise.


Half double crochet (hdc) 

Click here to watch the video.

  1. Wrap the yarn from the back to the front over the hook.

hlb1

Insert the hook from the front to the back in the 3rd chain (in order to have the height of 2 chains, and it counts as the first stitch of the row) from hook just below the upper loop in the small opening visible.

2. Wrap the yarn from the back to the front over the hook.

3. Pull the yarn through the same opening, leaving 3 loops on the hook.

4. Wrap the yarn from the back to the front over the hook.

hlb2 hlb3

Draw the yarn through all three loops on the hook while one loop stays on the hook.

When doing the next row, make 2 chain stitches and turn the work.

Make 1st half double crochet in the second opening below both the upper loops. The turning chains counts as the 1st half double crochet stitch.

 ALL the half double crochet stitches from now on are made below both the upper loops unless the pattern states otherwise.


Double crochet (dc) 

Click here to watch the video.

  1. Wrap the yarn from the back to the front over the hook.
  2. Insert the hook from the front to the back in the 4th chain (in order to have the height of 3 chains, and it counts as the first stitch of the row) from hook just below the upper loop in the small opening visible.

lb1a

3. Wrap the yarn from the back to the front over the hook.

4. Pull the yarn through the same opening, leaving 3 loops on the hook.

5. Wrap the yarn from the back to the front over the hook.

6. Draw the yarn through two loops on the hook.

lb2

7. Wrap the yarn from the back to the front over the hook.

8. Draw the yarn through last two loops on the hook.

lb 3 lb4

When doing the next row, make 3 chain stitches and turn the work.

Make 1st double crochet in the second opening below both the upper loops. The turning chains counts as the 1st double crochet stitch.

 ALL the double crochet stitches from now on are made below both the upper loops unless the pattern states otherwise.

Treble crochet (tr)

Click here to watch the video.

  1. Wrap the yarn from the back to the front over the hook.
  2. Insert the hook from the front to the back in the 5th chain (in order to have the height of 4 chains, and it counts as the first stitch of the row) from hook just below the upper loop in the small opening visible.

dsl1a

3. Wrap the yarn from the back to the front over the hook.

4. Pull the yarn through the same opening, leaving 4 loops on the hook.

5. Wrap the yarn from the back to the front over the hook.

6. Draw the yarn through two loops while 2 loops stay on the hook.

dsl2

7. Wrap the yarn from the back to the front over the hook.

8. Draw the yarn through next two loops on the hook.

dsl3

9. Wrap the yarn from the back to the front over the hook.

10. Draw the yarn through last two loops on the hook.

When doing the next row, make 4 chain stitches and turn the work.

Make 1st treble crochet in the second opening below both the upper loops. The turning chains counts as the 1st treble crochet stitch.

ALL the treble crochet stitches from now on are made below both the upper loops unless the pattern states otherwise.

For the larger stitches, the stitch pattern repeats in the same relationships.

You can also refer to my books for more complete step by steps of all the stitches, fancy stitches and patterns as well as techniques.


SaveSave

SaveSave

SaveSave

Posted in crochet, Magazines, Uncategorized

Blokhulp met Sigeunertop-patroon

Ek ervaar dat mense probleme ondervind om die patrone reg te verstaan of dat hulle sukkel om patrone te lees. Dit lyk amper of dié ‘n werkswinkel kan word! Ek het dit daarom goedgedink om die blokke se foto’s te plaas sodat julle die blokke kan visualiseer terwyl julle dit hekel of die patroon lees.

Die blokpatrone herhaal deurgaans deur die top, dus as jy die al die beginblokke onder die knie het, is die res maklik. As jy vind dat jou aantal rye korrek is, maar dat jou blok nie pas nie, kan dit wees dat jou spanning nie konsekwent is nie. Glo my, dit gebeur gereeld met patrone wat blokke in verskillende patroonsteke het. Pas dan jou aantal rye aan tot die blok pas.

Ek het weer deur elke blokpatroon gegaan en by slegs 2 blokke het ek korreksies aangebring wat dan by die blok aangedui word. Ek vra om verskoning vir die ongerief, maar kan jou waarborg dat die ‘tikfoute’ nie jou top gaan op’stuff’ nie. Dit is menslike foute wat maar insluip omdat dit ‘n baie omvangryke patroon is. Ek laat alles kontroleer, maar daar is altyd die moontlikheid dat iets oorgesien word. Ek sal altyd onthou hoe ek my verhandeling vir my meestersgraad ingehandig het, nadat 5 mense dit gekontroleer het. Die uiteinde – die eksaminator het 15 spelfoute gekry! Tot vandag toe, weet ek nie hoe dit oorgekyk is nie, maar dit gebeur.

Ek vra vriendelik dat indien jy vashaak met ‘n patroon om my persoonlik te inbox of ‘n epos na my te stuur by acaden@mweb.co.za. 90% van die kere uit my ervaring in afgelope 10 jaar van patrone skryf, is dit omdat patrone nie reg gelees word nie. Ek help graag en die wat my werkswinkels bygewoon het, sal weet dat ek ‘n geduldige leermeester is.

Hier is elke blok se patroon:

Blok 1:

IMG_4463

Blok 2:

IMG_4464

Blok 3:

IMG_4465

Blok 4:

IMG_4466

Blok 5:

IMG_4467

Blok 6: korreksie:

1ste ry: 1 lb in 6de ks vanaf pen, *1 ks, slaan 1 ks oor, ….

IMG_4468

Blok 7:

IMG_4469

Blok 8: korreksie:

Herh ry 2-6 nog 2 keer en dan ry 2-3 nog een keer = 18 rye in totaal.

IMG_4470

Blok 9: Korreksie: volg patroon en hekel 11 rye. IMG_4471

Blok 10:

IMG_4472

Blok 11:

IMG_4473

Blok 12:

IMG_4474

Blok 13:

IMG_4475

Blok 14:

IMG_4476

Blok 15:

IMG_4477

Blok 16: IMG_4478

Blok 17:

IMG_4479

Blok 18:

IMG_4480

Blok 19:

IMG_4481

Blok 20:

IMG_4482

Blok 21:

IMG_4483

Blok 22: IMG_4484

Blok 23: IMG_4485

Blok 24:

IMG_4486

Blok 25:

IMG_4487

Blok 26:

IMG_4488

Blok 27:

IMG_4489

Blok 7 agter:

IMG_4491

Blok 8 agter:

IMG_4490


Volle rugkant van top:

18697992_10209609736982422_7994478404957026466_n


Posted in crochet, Uncategorized

Moroccan Square Project Borders

After you have finished joining your squares you might run into trouble finding a suitable border for the finished project as the sides of each square has 29 stitches.

The best way to resolve this is to create a basic loop border from which you can elaborate further or leave it simple as it is. I have given two variations on the simple loop border. It is however a challenge to write these borders clear and understandable enough to follow, but hopefully the photo’s will clearly illustrate the pattern. I basically explained the basic pattern that repeats itself on all the sides as well as the corner pattern.

Abbreviations (American Terminology):

beg = begin, ch = chain, cl = cluster, dc = double crochet, rep = repeat, rnd = round, sc = single crochet, sp = space, ss = slip stitch, st = stitch

The simple loop border

IMG_4223

Start at the top right corner space of top right square:

Base rnd 1: 1 ch, *(1 sc, 1 ch, 1 sc) in the sp, (1 ch, skip 1 st, 1 sc in the next st) 14 times, 1 ch, 1 sc in the next corner sp of the same square, 1 ch, **1 sc in the corner sp of the next square, (1 ch, skip 1 st, 1 sc in the next st) 14 times, 1 ch, 1 sc in the next corner sp of the same square, 1 ch; rep from ** up to the last corner space of the squares and rep from * again for the next side and the other 2 sides, ss in the beg-sc.

Loop rnd 2: ss into the 1 ch-sp, *(1 sc, 3 ch, 1 sc) in the corner sp, (3 ch, skip 1 ch-sp, 1 sc in the next ch-sp) up to the last last sp before corner sp, 3 ch, rep from * to end, ss in the beg-sc.

Rnd 3: 1 ch, (3 sc, 2 ch, 3 sc) in every corner sp and 4 sc in every other 3 ch sp to end, ss in beg-sc.

Delicate border

 IMG_4219

Follow the simple loop pattern for rnd 1 and 2.

Rnd 3: ss into the corner 3 ch-sp, 7 ch, 1 dc in the same sp, (1 dc, 2 ch, 1 dc) in every 3 ch-sp and (1 dc, 4 ch, 1 dc) in every corner ch-sp to end, ss in 3rd of beg-7 ch.

Rnd 4: ss into the corner 4 ch-sp, 1 ch, [(1 sc, 3 ch) 3 times, 1 sc] in the same sp, (1 sc, 3 ch, 1 sc) in every 2 ch-sp and [(1 sc, 3 ch) 3 times, 1 sc] in every 4 ch-corner sp to end, ss in beg-sc.

Broad border (for blankets, etc)

 IMG_4220

Follow the simple loop pattern for rnd 1 and 2.


Rnd 3: ss into the 3 ch-sp, 3 ch, (1 dc, 4 ch, 2 dc-cl) in the same sp, (2 dc-cl, 2 ch, 2 dc-cl) in every 3 ch-sp and (2 dc-cl, 4 ch, 2 dc-cl) in every corner-sp to end, ss in top of beg-3 ch.

Rnd 4: ss into the 4 ch-corner sp, 1 ch, (1 sc, 3 ch, 1 sc) in the same sp, *3 ch, 1 sc in sp between next 2 cl, **3 ch, skip 2 ch-sp, 1 sc in sp between next 2 cl; rep from ** up to the coner sp, 3 ch and (1 sc, 3 ch, 1 sc) in 4 ch-corner sp, rep from * for the other sides, ss in beg-sc.

Rnd 5: ss into the 3 ch-corner sp, 1 ch, (2 sc, 3 ch, 2 sc) in the same sp, (2 sc, 3 ch, 2 sc) in every ch-sp to end, ss in beg-sc.

Posted in crochet, Uncategorized

Moroccan Square #9


This is the last square in the Moroccan Square series. It has a central pattern and the rest of the square is worked at the back of the central motif. Very easy square and also using back post stitches.

Next week I will share borders that can be used for your projects. I sincerely hope that you enjoyed the patterns. I have another series in the pipeline, but I will keep you posted. My book on different squares will also be released in May 2017 and I will share the info shortly.

Click here for free pattern:

The Afrikaans version is also on the site at http://www.vrouekeur.co.za.


Posted in crochet, Uncategorized

Moroccan Square #6

At first glance, the square looks a little bit more challenging than the previous squares. The only reason for this is that you work stitches in front and at the back of the rounds. At the end it forms a network of colour and layers. I also used front post stitches and clusters. By following the diagram, it will be really easy to do.

TIP: the square tends to be larger than the other squares – change to a slightly smaller hook if it is the case.

Click on link for free pattern:

The Afrikaans is also available on www.vrouekeur.co.za.

blok 6fin